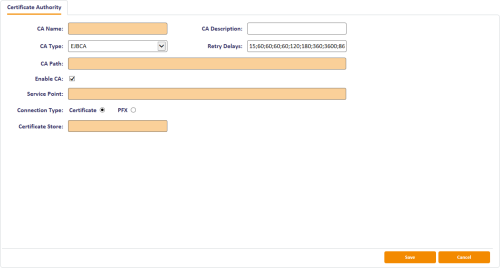
3.8 Configuring the CA within MyID
Configure the PrimeKey PKI CA using the Certificate Authorities workflow.
-
Put the RA certificate file on the MyID application server.
Note: The MyID named COM+ user must have access to this file.
- From the Configuration category, select Certificate Authorities.
- Click New.
-
From the CA Type drop-down list, select EJBCA.
-
Type a CA Name.
This is a friendly name that is used to identify the CA.
-
Type a CA Description.
This is a description for the CA.
-
Set the Retry Delays.
This is a semi-colon separated list of elapsed times, in seconds.
For example, 5;10;20 means:
- If the first attempt to retrieve details from the CA fails, a second attempt will be made after a 5 second delay.
- If this second attempt fails, the CA will be contacted again after 10 seconds.
- Subsequent attempts will be made to retrieve information every 20 seconds, until a response is received.
If you want to limit the number of retry attempts, enter 0 as the last number in the sequence.
The default is:
15;60;60;60;60;120;180;360;3600;86400;0
This retries after 15 seconds, then after a minute four times, then two minutes, three minutes, six minutes, an hour, 24 hours, then stops.
-
Type the CA Path.
The CA name as configured on the EJBCA. The name is not case-sensitive.
- Make sure that the Enable CA checkbox is selected.
-
Type the Service Point.
This is the full URL for the PrimeKey-hosted certification authority web service; for example:
https://myserver.com:8443/ejbca/ejbcaws/ejbcaws
Note: The EJBCA web service API is called ejbcaws, and is located in the directory named ejbca/ejbcaws – therefore, the web service full URL ends with the following:
/ejbca/ejbcaws/ejbcaws
-
If you are using a CER file; for example, for an HSM-based RA certificate, or for a software-based certificate that has been installed to the MyID COM+ user's personal user store (as described in section 3.3, Configuring the MyID RA user):
- For the Connection Type, select the Certificate option.
-
Type the location of the certificate file in the Certificate Store box.
For example:
C:\PrimeKey\RACert.cer
-
If your RA certificate is held in a PFX file:
- For the Connection Type, select the PFX option.
-
Type the location of the certificate file in the PFXCertificate Store box.
For example:
C:\PrimeKey\RACert.p12
-
Type and confirm the password for the certificate (only required for a pfx or p12 certificate store).
Note: You are recommended to enroll the private key into a CSP or KSP for establishing the secure connection to avoid the additional overhead related to using a p12 or pfx files.
-
Click Save.
You can now go back into the Certificate Authorities workflow and set up your certificate templates.
Note: If your RA certificate is held in a PFX file, you must restart the eCertificate service before you can set up your certificate templates within MyID.:
- From the Windows Administrative Tools, double-click Services.
- Right-click the eCertificate Services Server service, then from the pop-up menu click Restart.
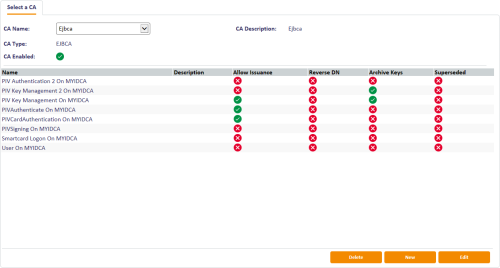
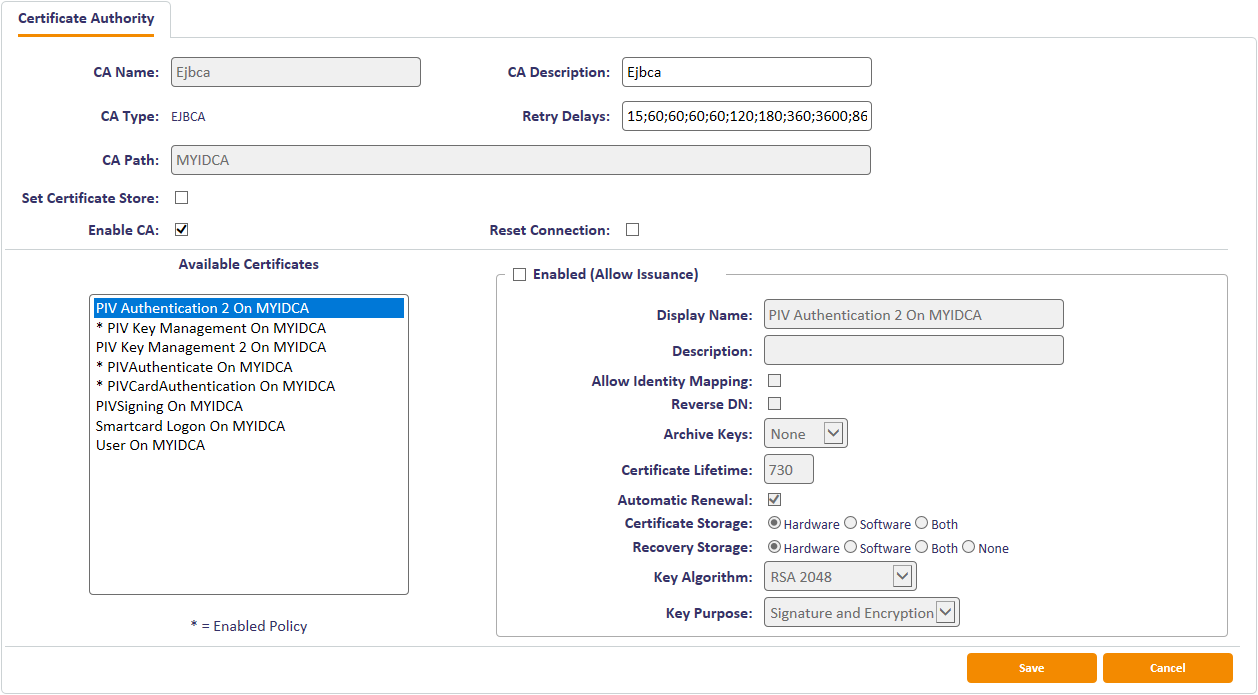
3.8.1 Enabling certificates policies on a CA
Note: Because of the way MyID manages PrimeKey PKI certificate template names, the displayed Friendly name is the name of the end entity profile on the PrimeKey EJBCA that references the CA as identified in the CA Name field.
Although all certificate templates are detected when you add the CA to MyID, they are all initially disabled. To enable them:
- From the Configuration category, select Certificate Authorities.
-
From the CA Name drop-down list, select the certificate authority you want to work with.
-
Click Edit.

- Make sure Enable CA is selected.
- Select a certificate template you want to enable for issuance within MyID in the Available Certificates list.
- Click the Enabled (Allow Issuance) checkbox.
-
Set the options for the policy:
-
Display Name – the name used to refer to the policy.
-
Description – a description of the policy.
-
Allow Identity Mapping – used for additional identities. See the Additional identities section in the Administration Guide for details.
-
Reverse DN – select this option if the certificate requires the Distinguished Name to be reversed. This setting has an effect only when the EJBCA policy is configured to use the subject DN from the supplied PKCS10. A key management certificate request does not have a PKCS10.
See section 3.9.3, Additional attribute settings for details.
-
Archive Keys – select whether the keys should be archived. For policies configured for key archive, set this option to EJBCA Client.
-
Certificate Lifetime – the life in days of the certificate. This is defaulted to the maximum allowed life imposed by the certificate policy on CA.
-
Automatic Renewal – select this option if the certificate is automatically renewed when it expires.
-
Certificate Storage – select one of the following:
- Hardware – the certificate can be issued to cards.
- Software – the certificate can be issued as a soft certificate.
- Both – the certificate can be issued either to a card to as a soft certificate.
-
Recovery Storage – select one of the following:
- Hardware – the certificate can be recovered to cards.
- Software – the certificate can be recovered as a soft certificate.
- Both – the certificate can be recovered either to cards or to a soft certificate.
- None – allows you to prevent a certificate from being issued as a historic certificate, even if the Archive Keys option is set. If the Certificate Storage option is set to Both, the certificate can be issued to multiple credentials as a shared live certificate, but cannot be recovered as a historic certificate.
-
Additional options for storage:
If you select Software or Both for the Certificate Storage, or Software, Both, or None for the Recovery Storage, set the following options:
-
CSP Name – select the name of the cryptographic service provider for the certificate. This option affects software certificates issued or recovered to local store for Windows PCs.
The CSP you select determines what type of certificate templates you can use. For example, if you want to use a 2048-bit key algorithm, you cannot select the Microsoft Base Cryptographic Provider; you must select the Microsoft Enhanced Cryptographic Provider. See your Microsoft documentation for details.
-
Requires Validation – select this option if the certificate requires validation.
Note: This option is available only if you select Software or Both for the Certificate Storage option.
-
Private Key Exportable – when a software certificate is issued to local store, create the private key as exportable. This allows the user to export the private key as a PFX at any point after issuance.
It is recommended that private keys are set as non-exportable for maximum security.
Note: This setting affects only private keys for software certificates – private keys for smart cards are never exportable.
-
User Protected – allows a user to set a password to protect the certificate when they issue or recover it to their local store.
This means that whenever they want to make use of the soft certificate, they will be prompted for a password before they can use it. This is a CSP feature that is enabled when you set this option, and affects only software certificates that are issued or recovered to local store for Windows PCs.
-
- Key Algorithm – select the type and length of the key-pairs used for certificate generation. A longer key length is more secure but certain manufacturers' CSPs do not support longer lengths. Select the appropriate key length from the list. This must match the key type and length set up in your CA.
-
Key Purpose – select one of the following:
- Signature – the key can be used for signing only.
- Signature and Encryption – the key can be used for either signing or encryption.
Note: The Key Purpose option has an effect only where the device being issued supports the feature. PIV cards do not support this feature, while smart cards issued with minidrivers and software certificates issued to local store for Windows PCs do support this feature.
-
-
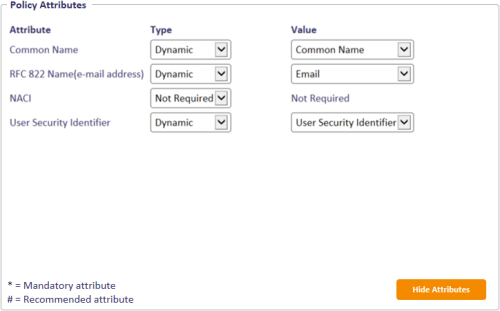
If you need to edit the policy attributes, click Edit Attributes.
For details of adding the User Security Identifier
-
For each attribute, select one of the following options from the Type list:
- Not Required – the attribute is not needed.
- Dynamic – select a mapping from the Value list to match to this attribute.
- Static – type a value in the Value box.
- Click Hide Attributes.
Note: MyID may not override the settings of the CA. You need to obtain the correct settings from the administrator of your CA.
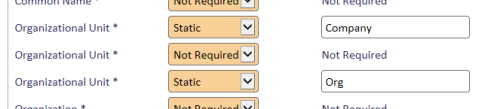
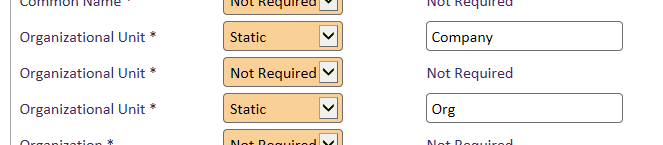
Important: Where there are repeated components, do not leave intermediate attributes as Not Required (as shown below) as this may result in certificate request failure, depending on the profile configuration:
-
- Click Save.


Note: Changes made to certificate profiles do not take effect immediately, as the normal interval for MyID to poll for updates is 50 minutes. To force MyID to poll for changes immediately, you must manually restart the eKeyServer service, then restart the eCertificate service.
3.8.2 Mapping the additional attributes
You must use the Edit Attributes option for each certificate policy in the Certificate Authorities workflow to set up a mapping or a static value for each of the additional attributes that you want to pass in the certificate request. See section 3.8.1, Enabling certificates policies on a CA for details.
For details of adding the User Security Identifier
3.8.3 Configuring attributes
The end entity profile configuration is used to determine which attributes are available for the corresponding certificate policy within MyID.
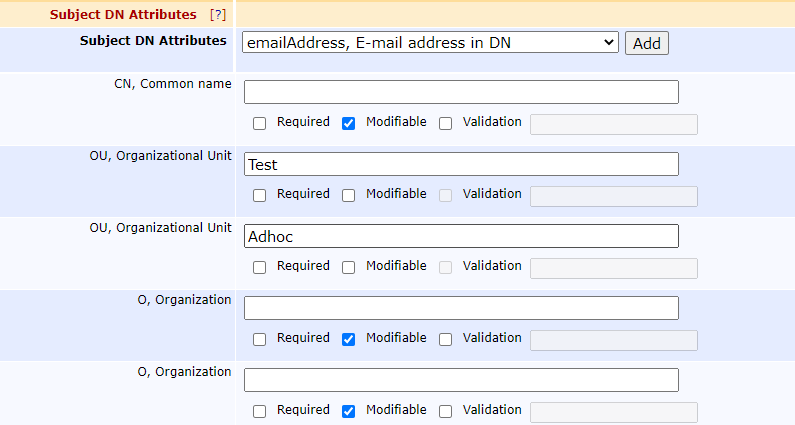
The following shows an example of configuring Subject DN Attributes:
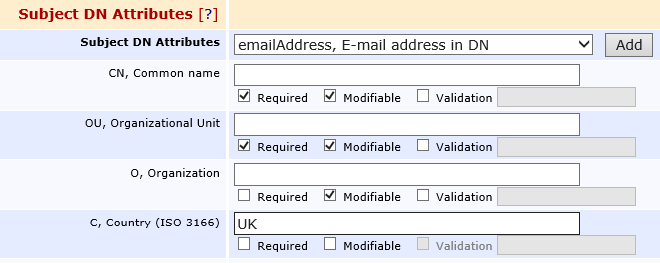
The following subject attributes are defined in the above example: Common Name (CN), Organizational Unit (OU), Organization (O), and Country (C). Of these, the CN and OU attributes are mandatory, and C has a non-modifiable static value.
Note: The default value for an attribute is used only if the attribute is not modifiable.
The available Subject DN and Subject Alternative Name attributes are limited to the attributes that are supported by the EJBCA, not all of which are supported by MyID. The attributes for which MyID provides a dynamic mapping, for the inserted attribute value, are listed below:
|
Ejbca End Entity Profile Attribute |
Attribute Group |
MyID Attribute Mapping |
|---|---|---|
|
Common Name |
Subject DN |
Common Name |
|
Domain Component |
Subject DN |
Domain |
|
First Name |
Subject DN |
First Name |
|
Full Name |
Subject DN |
Full Name (name) |
|
Organizational Unit |
Subject DN |
Group Name or Application Group |
|
DN Serial Number |
Subject DN |
Serial Number |
|
Surname |
Subject DN |
Surname |
|
Title |
Subject DN |
Title |
|
RFC 822 Name (email address) |
Subject Alt-Name |
|
|
FASC-N |
Subject Alt-Name |
FASC-N (Hex) |
|
User Principal Name |
Subject Alt-Name |
User Principal Name |
|
Uniform Resource ID |
Subject Alt-Name |
UUID (ASCII) |
You can use attributes for which MyID does not have default dynamic mapping, but these would require static value or custom implementation.
Note: You must not set dynamic mappings of attributes to Organizational Unit or Distinguished Name, as these may be made of multiple attribute components and therefore will result in the certificate request being rejected by the EJBCA.
Note: You must supply a mapped value if the attribute is configured as being mandatory in the end entity profile in the EJBCA.
3.8.4 Removing attributes
If you remove an attribute component from an End Entity profile, the policy attribute is no longer visible in the Certificate Authorities workflow.
As such, if you have previously configured the attribute in MyID, it remains configured; however, the operator can no longer manage the attribute.
You are recommended to remove any attributes from MyID by resetting the attribute as Not required in the Certificate Authorities workflow before removing them from the CA End Entity profile setting.
3.8.5 Deleting a CA
You can delete a CA from the list of available CAs if you no longer need to be able to work with it, or if you created it in error.
See the Deleting a CA section in the Administration Guide for details.
3.8.6 Repeated policy attributes
MyID displays the policy attributes as defined in the End Entity Profile on the CA. To allow a DN with a duplicate component to be provided in a certificate request, the component is also required to be duplicated in the End Entity Profile in the CA, with the number of duplications matching the maximum number of such duplications in user DNs for that component. This results in the attributes also being duplicated within MyID. MyID is able to internally distinguish between these duplicate attributes but this distinction is not visible to the user.

Where DN component values are provided through the policy attributes that are configured through the Certificate Authorities workflow in MyID, these are added to the DN that is supplied in the certificate request in the order that the attributes are received by the CA connector. Any DN component that is defined in the End Entity Profile, but for which values is not supplied in policy attributes, are automatically added by the CA connector using the supplied user DN.
Where a DN component values are fixed, and the order of the values is important, it is recommended that default, non-modifiable, values are specified in the End Entity Profile in the CA. The order of the fixed attribute values specified against the policy in MyID must then match the attribute values configured in the CA. A certificate request with the DN component values in a different order would be rejected.
The actual order in which the DN components are written to a certificate is dependent on various settings within the Certificate Policy in the CA. See section 3.9.3, Additional attribute settings.